East Midlands Oral History Archive
Digitising oral history recordings
As analogue sound becomes a thing of the past, digitisation has become something that it is impossible to avoid. Many things have been digitised, from museum collections to the complete works of Shakespeare. However, the word “digitise” covers a multitude of sins, and we would urge you to think about exactly what you want to digitise and why before you start to worry too much about the how.
In simple terms digitising simply means transferring any body of information whether it be words, pictures or sound into a series of numbers (digits) that can be read by computers and a variety of other devices. Digital information can be stored in a variety of different formats that you will probably be familiar with already (computer hard disc, CD, digital tape, DVD etc.).
To digitise analogue (non-digital) sound recording you will need something to play back the original recording, a computer, specialist software, and cables to connect the computer and the playback device.
How do I record onto my computer?
You are likely to want to record sound from a number of different sources. You may have sound on reel to reel tape, cassette tape, mini-disc, vinyl or other formats.
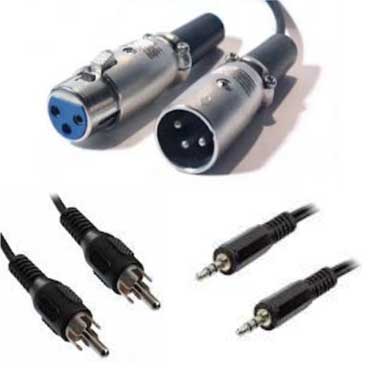
You will need to identify how to connect your playback device (cassette player, reel to reel player, record player etc.) to your computer. Unless you are using an intermediary device (see later) your computer will probably accept a mini-jack (see photos below). Cassettes usually have phono outputs, reel to reel players will vary.
Once you have your playback device connected to your computer, you will need some sound editing software.
What should I use to edit sound on my computer?
 There are a variety of programs available for editing sound on your computer. You can download Audacity, a good sound editing program, for free , but there are other free examples available. Among others, Acoustica provides mid-price options which are available online for a trial period and then cost in the region of £35, and your local computer shop is likely to sell something similar in this price range. Another example is Amadeus.
If you have more money to spend you might want to look at Adobe Audition. For basic tasks these products do not offer many advantages over the free alternatives. However, they do offer a series of useful add-on modules that allow you to do hiss removal, work with multiple tracks or apply a variety of effects to your sound.
How do I edit a sound file?
 Your sound editing program will allow you to edit and save sound files in a variety of formats (.mp3, .wav etc). These formats are different ways of storing sound. They will vary in the quality of the sound and the size of the file, and we recommend that you store your recordings as .wav files for archival purposes.
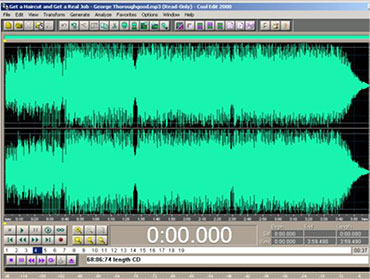
If you open a sound file in a recognised format in your sound editing program you should see something that looks like this:
If you press the play button below the sound file you will see a line begin to work its way through the sound file and hear the sound file play. For a new recording the red record button will start the software recording whatever signal it detects as the input. Aim to record so the sound peaks at around the –6db level on the Record Level bar at the bottom of the window. You can use the Sound Recording Volume level to adjust this if it is peaking too high. With digital recordings it is easier to boost the volume of a quiet recording than it is to remove distortion from a loud recording.
Record at a minimum of 44.1khz 16 bit, which is CD quality. Many archives record at a higher quality than this e.g 44.1khz 24 bit or 48khz 24 bit. Save sound files as .wav files, not as .mp3 or anything else (.wav files are uncompressed and are more likely to be able to be listened to in years to come).
The various menus will enable you to cut and paste different parts of the sound file, zoom in and out for fine editing, and adjust volume and tone. The more sophisticated the software the more likely you are to be able to remove a certain amount of hiss and reduce the effect of any unwanted noise. Even the most basic software will enable most oral historians to perform simple edits and save the sound file for posterity.
Analogue digital converters
Your computer will convert the analogue signal from your tape or vinyl to a digital signal but some people prefer to get a higher quality stand alone unit to do this. This will connect to the computer via a USB or Firewire cable and should accept different inputs, such as phono or XLR, from your play back equipment.
These units can be expensive and if you are not comfortable with using this sort of equipment they add another layer of complexity to proceedings.
Back up your recordings
Whether you use hard drives or CD/DVDs it is vital that you make back ups of your recordings. Do not trust the hard drive of a computer or separate storage device to last for more than a few years. A useful acronym to remember is LOCKSS—Lots Of Copies Keeps Stuff Safe—and we recommend you make copies on both CD/DVD and hard drives.
Useful websites
What if it doesn’t work?
There are a number of fairly common reasons why you might not be able to hear your sound file playing if you are using a Windows system.
- Your speakers are turned down. Simply turn the volume knob on the speaker up.
- Your sound card is turned down. Go to the Start menu and then choose Settings and Control Panel. Click on the Sounds and Multimedia icon and then on the Audio tab on the dialogue box that is displayed. Next choose the Sound Playback volume button and check that the Volume Control slider is pushed into the top half of the slider and that the mute box is not checked. This all sounds very technical, but is actually very straightforward to follow once you get the hang of it. If you are going to edit a lot of sound you will unfortunately have to get used to fiddling about with the various sound controls on your computer.
- You haven’t got any speakers. These can be bought cheaply and plugged into your computer very simply.
- You haven’t got a sound card. You will need to make sure that your computer has a sound card before you attempt to listen to any sound using your computer. These are not expensive but you will probably need some guidance from your PC retailer on how to fit one.
Nothing is recording!
Check that your sound card is set to the right input. Go to the Start menu and then choose Settings and Control Panel. Click on the Sounds and Multimedia icon and then on the Audio tab on the dialogue box that is displayed. Click on the Sound Recording Volume button and make sure that CD Audio is selected and that the volume is pushed up to the top.